To Bean or Not To Bean

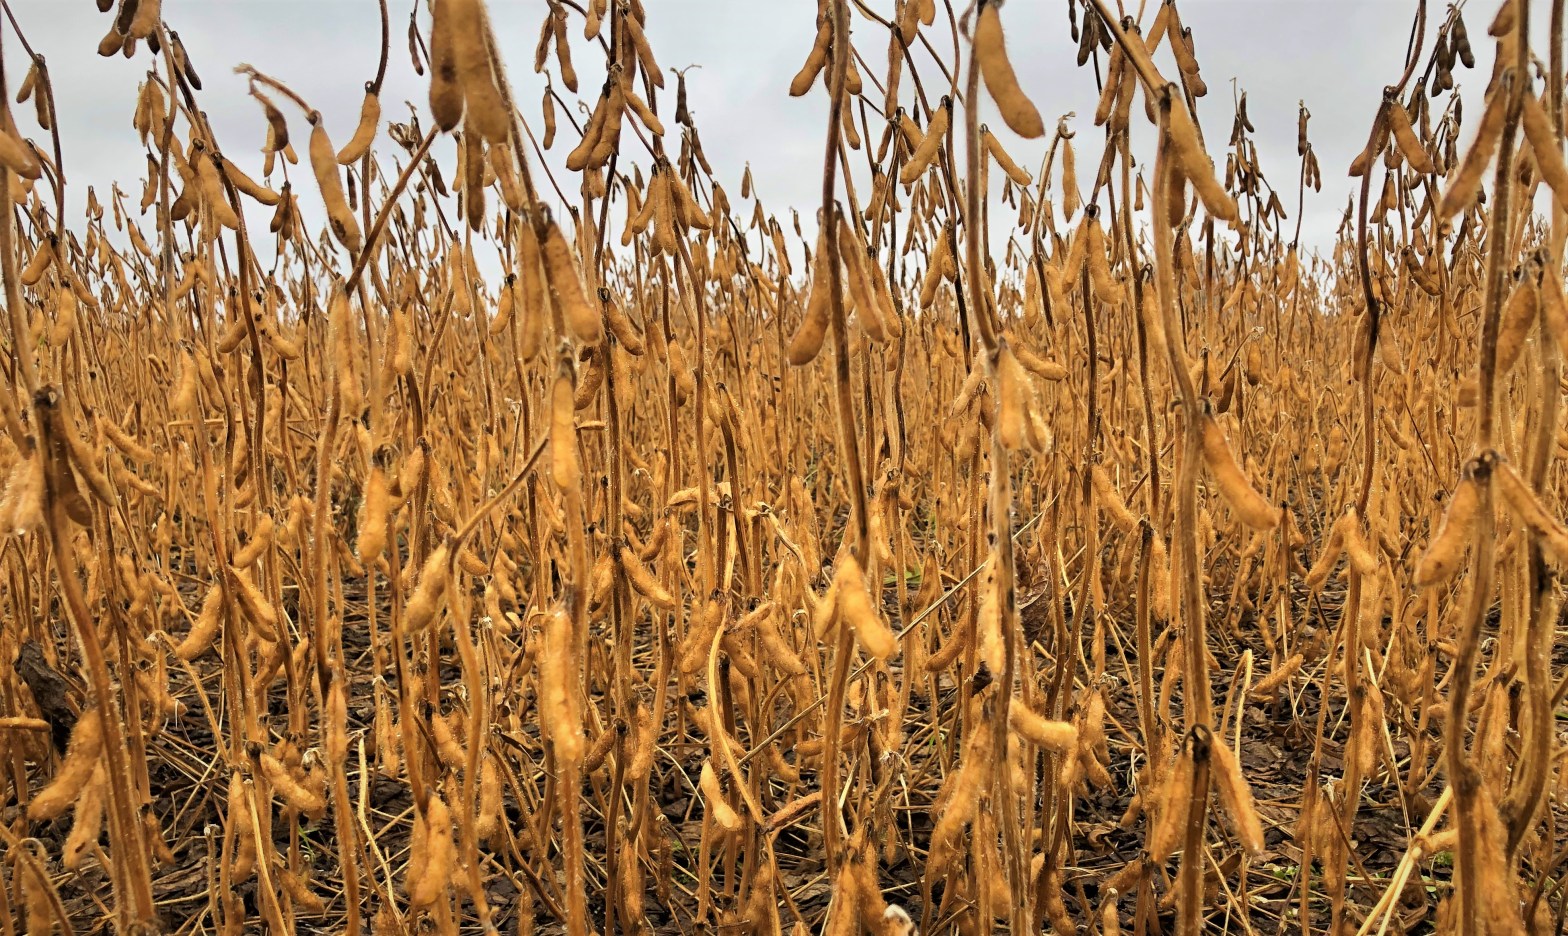
Soybeans. You’re a very interesting crop and it’s been great learning so much about you, but the last couple years have been a constant love hate relationship. Love – you give us a much needed 3 year crop rotation, you’re fairly low maintenance, and you stand great at harvest … Hate – you don’t seem to be getting the timely August rains you need, more times than not you lose the battle with volunteer RR canola poking through your canopy, and if you’re still green at the beginning of September the risk of early frost is a fear I always have. So the question I keep asking myself, do we continue this relationship or wait a couple years and then try again?

All jokes aside, the vast majority of growers in the province are still needing to complete harvest so I’m very reluctant to talk about seed, heck even the thought of mentioning fall fertilizer to some farmers kills my mood at this point. We’re fortunate to be getting some nitrogen into the ground, and the questions/comments are starting to roll in … Is it even worth it for me to grow beans again? You know, beans are going to be a very hard sell for you this fall. If I do grow beans next year, what can we do better?

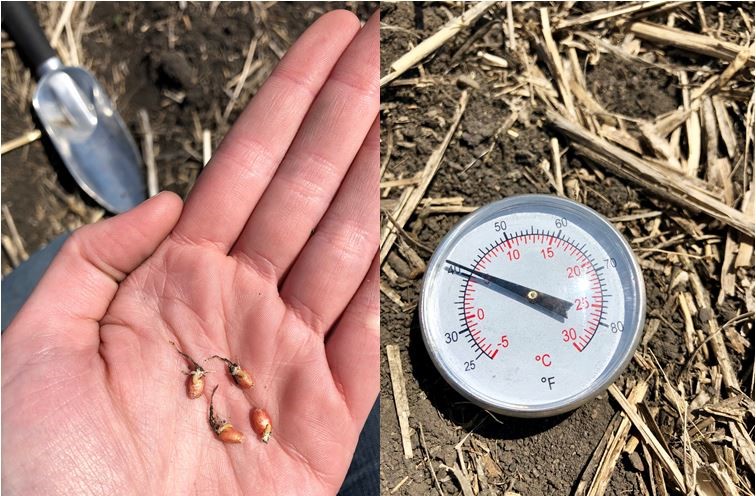
Here’s a little background on my experience with soybeans. Up here in the slightly North Western part of Manitoba, they are a very new crop to us, most growers in the area only started planting them 4 years ago. Since then … we’ve had one amazing yield year, one okay year, one not so hot year, and well this year we’re not sure yet. I am optimistic though, we had a late August rain that did some good for the top pods but plants definitely did not fill to their full potential. So the top seeds are small and few, but they are there … so with that, I’ve got my fingers crossed for a 32 bu/acre average. In 2018, I partnered with a local farmer and sowed 16 very early to early season variety plot … I brought in industry professionals and encouraged hands on learning to growers in the area so we could all learn from one another. This created great discussion but yields fell short, we didn’t receive the August moisture we desperately needed, so many growers opted out of the rotational option. Sticking to what they know best, wheat and canola. I was hoping this season would and could change some minds, but the end of October is coming up quick and that wishful 40 bu/acre yield isn’t going to be a reality. We don’t even know yields yet and seed variety decisions are coming at us fast, some companies even have early booking discounts available for the end of this month. And with more and more varieties coming into the market, how does one choose what to grow out of the many choices available to them in their region? Of course, first look at CHU’s (crop heat units) and the RM (relative maturity) associated with your area. For my area, we need very early season varieties … 2275 CHU’s which equals 0.009 RM to be exact, making Syngenta’s S0009-M2 is a crowd favourite around here for those who are still optimistic about soys.

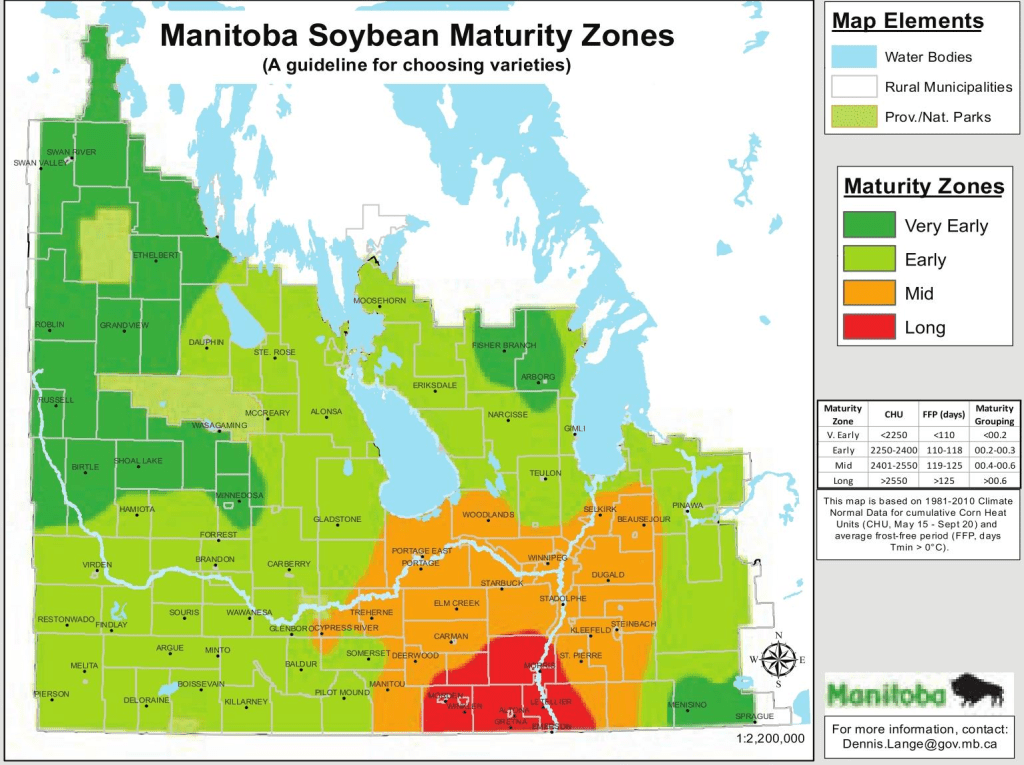
For more information on what varieties fall under the maturity zone you’re located in, check out the Manitoba Seed Guide … http://www.seedmb.ca/digital-edition/?documentID=e7139712-f01f-4eae-a035-59c74b8f9415

Now, for the farmers who are still willing to give soybeans a chance, my next step is suggesting that we do a soil test for the field(s) they’re planning on sowing beans to. Whether it be seed/variety selection or preparing the field for next year with fertilizer, the information I’m after is provided from the sample results.

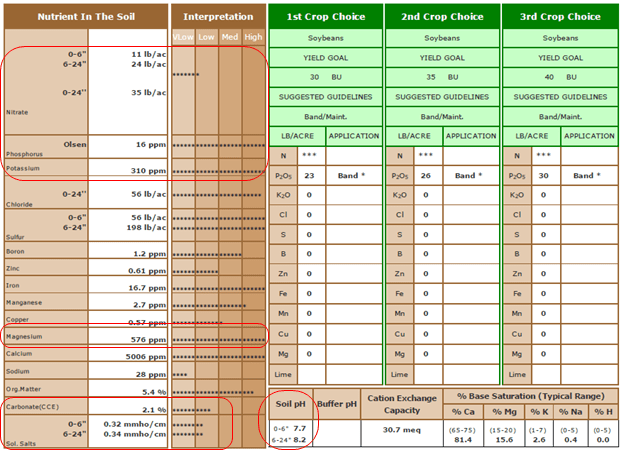
I have circled some key areas I am going to focus on.

NPK: Nitrogen. Phosphate. Potassium. Soybeans frankly are fertilizer pigs, a 40 bu/acre soybean crop will remove approximately 152 lbs/acre of nitrogen, 32 lbs/acre of Phosphate, and 56 lbs/ac of Potash. So we must pre-plan for this removal and adequately provide the crop what it needs. When it comes to nitrogen, we dual inoculate at planting … a liquid option on seed and a granular option in furrow. This provides the seed/roots with the nitrogen fixing bacteria it needs to create nodules which in turn sufficiently provides each bean plant with season long N. (Slightly off topic, but a interesting little tidbit of info, as a grower or agronomist assess your plants around the V3 stage for nodulation … at least 10 healthy (crack in half to see pink goop) nodules per plant are needed to provide the required N needs). As for phosphate and potash, don’t cut corners, especially with K. Typically for land around here, of course taking into consideration soil test results and fertilizer history, I suggest a 20P/40K or 30P/50K blend.

Mg: Low levels of magnesium in a field can present a higher potential for Sclerotinia (white mold) infection to set in. Mg deficiency issues can easily be mistaken for IDC as magnesium aids chlorophyll molecules, so if a plant is lacking it will begin to yellow interveinally. Adequate levels of Mg will also aid to increase nitrogen, phosphate, and water uptake. In my side of the province, we typically do not have to worry about low magnesium levels.

Carbonates & Soluble Salts: As a general rule of thumb to help prevent IDC (Iron Deficiency Chlorosis) symptoms … select a field with soluble salt levels of 0.8 or lower & carbonates that don’t go much higher than 2%.

pH: I’ve never really focused on pH as our soils are typically neutral to slightly alkaline. But, a presentation I attended a few years ago made mention that soybeans will perform best when soil pH levels are between 6.0-7.0, but that they prefer the low end of the 6.0 range. The presenter also made mention that planting into low pH may reduce plant structure and root development.  So it doesn’t hurt to take a look at what your pH levels are!

So, what is the fate of the soybean? I know that acres of soybeans in my area are going decrease, the acres are going to go down provincially as well. Farmers are opting to a add peas, a shorter season crop, to their rotation as they’ve been yielding well and the opportunity of selling to Roquette (a protein manufacturing plant in Portage la Prairie) is now available. As an agronomist, I hope to be given the opportunity for the 2020 season to scout some soybean fields and continue to learn about the crop … so my fingers are crossed that they haven’t met their demise!

Baby, It’s (a tad) Cold Outside

Seriously Mother Nature, it’s May. I thought we were past the below zero temperatures, wind chills, frosts, and snow. But, I guess not. We have crops to get into the ground, but what’s considered too early? Are we shooting ourselves in the foot by seeding in too cold of soils? And how can the efficacy of glyphosate be affected by our cool day time highs? Let’s get right into it.

It all starts with a seed. And we need to try and give that seed the best start we possibly can. But, even though the time crunch is on and acres need to be sown we still need to take some considerations into mind. Aiming to plant at a given crops optimal germination temperature is a big one. Manitoba weather has been far from the expected normal, and farmers have had to seed into chillier soils. In doing so, the potential of infection from soil pathogens (cause seedling diseases), poor germination, staggered germination, and seedling mortality has increased. Seed treatments are an aid to help lower these risks if one must plant into cold soil temperatures; they help protect the seed/seedling to give it the best possible start at germination to increase survival. Reduced and uneven plant stands just add to a later, in season list of problems. From staging issues at herbicide and fungicide timing to creating a more favourable setting for weed and insect pressure, the crop may experience stressors and a potential for yield loss throughout the season. Pictured above is wheat seed that was treated with Raxil Pro and planted 11 days prior to this photo. We’ve had the works since then … frost, a little bit of snow, below 0˚C soil and overnight temperatures. Many had to sow in cool temperatures so I recommended the agronomic practices that would best help ensure an improved germination potential and reduce some of the risks mentioned above. Starting with seed treatment, it was suggested that the wheat be planted slightly shallower than normal (as long as adequate moisture was still present) to try to have a warmer seed bed during day time highs, and that the seeding rate be bumped up to compensate for poor emergence or seedling death. When it comes to canola, the soil temperature is something I consider to be more critical. A given seed treatment option can last from 21-35 days, and from the moment that seed is first sown the countdown is on. So, if you are planting in less than ideal soil temperatures that seed will be very slowly germinating, and when the canola seedling finally emerges the treatment left on the seed will be minimal. Leaving canola with little defense against pests such a flea beetles, cutworms, etc. High populations of flea beetles (mostly crucifer) were present last August, feeding on volunteers and smaller staged brassica species. This is typically a good indicator that they will be present the following spring, so we must consider the potential of this risk when seeding canola this spring.

Optimal Seeding Temperatures for Manitoba:

  • Cereals (wheat, barley, oats) → 4˚C
  • Peas → 4-5˚C
  • Canola → 5-7˚C (ideally, I would prefer 7+˚C)
  • Soybeans → 10˚C

The harvest 2018 season was a hectic one, with the first 6+ inches of snow at the end of September a lot of farmers struggled to get crops off before the snow came to stay for good. Many did very little to no post-harvest spraying; the only weed control that got done for the most part was pre-harvest desiccation. Going into the 2019 seeding season I expected to see dirty fields, but with these cool temperatures there is very little new growth of annuals and the perennials are just starting to green. Glyphosate is a group 9 systemic herbicide, which means the product must hit the plant leaves in order for the chemical to make its way to the growing point to kill the weed. The optimal temperature range for spraying glyphosate is 16-24˚C, at this temp the plants (weeds) are actively growing and are not under any temperature related stresses, so they can efficiently take up the product. But in turn, temperatures lower than 15˚C the plant growth begins to slow down and in correlation the herbicide uptake will slow down. In ideal spraying temperatures, the glyphosate will translocate to the plants growing point typically within 24 hours, under temperature stress this process may take up to 5 days. The guideline for minimum temp for spraying is 10˚C, and only consider spraying if this temperature is/will be maintained for 2-4 hours after application. One must also take into mind if the evening after spraying will experience a frost, a heavier frost of -5˚C or colder may reduce control. The plant may have become damaged before the glyphosate had a chance to properly translocate, therefore reducing the overall efficacy.

There are so many factors that come into play with farming, so if you ever have any questions do not hesitate to reach out!

Top 5 Items Every Agronomist Needs in Their Pickup

I figured there was no better time than the start of a brand new crop season to launch my website and my first blog post! Things are definitely busy in my neck of the woods, between crops being seeded and baby calves running around, I have enough going on to keep my days full. My life rarely seems to have a dull moment and I always manage to keep myself tied up with something, so let’s consider this blog my new official project. I am very excited to be (finally) starting this adventure and hope to inspire you with my everyday country living. So to kick things off, I thought I’d focus on some of the tools I have in my scouting arsenal (and by that, I mean a faded Rubbermaid tub).

Planting for the 2019 season is officially underway in Manitoba. I am employed in the north western part of the province, so some of us have got going (before this past weekend’s snow) and some of us are still itching to officially start. Wheat is typically the first crop to go in the ground around here due to the fact that cereal seed is quite cold tolerant for germination. But, that doesn’t mean a grower should jump the gun on seeding. One must take into consideration the soil’s temperature first, taking a morning and late afternoon thermometer reading (then average the two) will help you determine where your soil is at. Wheat will successfully and adequately germinate between a soil temperature of 4-5˚C (39-41˚F), and if one chooses start in colder temps, they must adjust their seeding rate accordingly (due to increased mortality potential).

So now to officially kick the 2019 scouting season off, here are the top 5 items and resources I personally think every agronomist should carry around with them in their pick-up!

#1 – Crop Protection Guides → These are a great resource to keep on hand, they never seem to leave my side and I always make sure to carry them around with me for second checking information. I’ve invested hours into tabbing and flagging important pages, so if you see a guide with my name boldly sharpie’d across the front DO NOT dare steal it (I will come looking for you). Both guides have their pros and cons but, are great resources to frequently refer to. I’m a little more so old fashioned and prefer to have the paper copy in my hands, but I have included the links below so you can access the free downloadable PDF copies.

Manitoba Guide to Field Crop Protection 2019 – https://www.gov.mb.ca/agriculture/crops/guides-and-publications/pubs/full-2019-guide-crop-protection.pdf

Alberta Crop Protection Guide “Blue Book” 2019 – https://open.alberta.ca/dataset/1be9589f-31f6-4841-a6b8-34b32e8e19b4/resource/753672e4-77b8-4a70-8cbd-08e42077a9d1/download/606-1-2019.pdf

#2 – Company Product Guides → If I am looking for specific product information I will always refer to the corresponding company guide first. These will provide you with the use crops, weeds controlled, tank mix compatibility partners & order, etc. and frankly, sometimes the crop protection guides have typos with these specifics, so I prefer to get this information straight from the each companies literature itself.

#3 – Trowel →Please, pretty please, use a trowel when you want to assess the roots on a plant. I’ve watched many simply pull a soybean plant straight out from the ground and then attempt to count the nodules on it, ummm well now you’ve ripped half them off so you’re not properly assessing anything here. Using a trowel just makes digging up plants way easier, and it conveniently fits in your truck door. So, win win.

#4 – Weed, Disease, Staging Guide, etc References There are lots of great resources out there. Each of the provincial commodity associations provide great staging guides for each crop, as do many of the seed companies as well. For a weed ID reference, my go to is Weeds of the Prairies, my favourite feature is that it includes seedling – mature stage photos for easy identification. The Diseases of Field Crops in Canada textbook provides lots of information and photos for various diseases, and organizes each one by crop. I am a visual learner, so the more photos to reference from, the better.

#5 – Sun Screen & Bug Spray → This should be fairly self explanatory, so I am taking this opportunity to tell you a funny story. I model part time, and am signed with an agency in my home province. Last June I had a fashion photo shoot, so I modeled various outfits and looks. One of which required me to tie up the shirt I had on to expose a little bit of my stomach, I didn’t think anything of it until I got the proofs back from the photographer. They had to put them all in black and white because my arms were very notably darker than my pasty, ghost resembling stomach. Oi, we had a good laugh about it afterwards and I had to explain as to why I only tanned my arms (the true meaning of the farmers tan needed a little explanation haha).

Cheers to a safe and successful seeding season!

Recipes


These are my all time favourite, they instantly take me back to sharing a pot of Red Rose tea (Gramma’s go to) as we enjoyed a fresh batch of these ooey gooey cookies.

Preheat oven to 375˚F. Grease a cookie sheet or bake on parchment paper. Yields 3 dozen.

  • 1 cup Cornflakes
  • 1 cup Brown Sugar
  • 1/4 cup White Sugar
  • 1 cup Butter
  • 1 Egg
  • 2 tsp Vanilla
  • 2 cups Oatmeal
  • 1 cup Whole Wheat Flour
  • 1 tsp Baking Powder
  • 1 tsp Baking Soda

Toss the cornflakes into a small bowl and crush them into fine pieces. Blend the brown sugar, white sugar, and butter together in a large bowl. Add the egg and vanilla to the mixture ensuring you blend everything well. Then add the oatmeal, whole wheat flour, baking powder, and baking soda. Combine until mixed well, but avoid over mixing! Roll the cookie batter into ~1″ balls, then roll each one in the crushed cornflakes until completely covered. Evenly space out 12 cookies per sheet (as they spread out a lot) and press down with a fork. Gramma always told me we had to watch these like a hawk as they brown very quick, and depending on your oven each batch only takes 5-7 minutes.